 Twitter
 Facebook
 Flickr
 RSS
RSS
1. Tab navigation. Instead of using the mouse to select different tabs that you have open, use the keyboard. Here are the shortcuts:
* Ctrl+Tab (rotate forward among tabs)
* Ctrl+Shft+Tab (rotate to the previous tab)
* Ctrl+1-9 (choose a number to jump to a specific tab)
2. Mouse shortcuts.
* Middle click on link (opens in new tab)
* Shift-scroll down (previous page)
* Shift-scroll up (next page)
* Ctrl-scroll up (decrease text size)
* Ctrl-scroll down (increase text size)
* Middle click on a tab (closes tab)
3. Speed up Firefox. If you have a broadband connection (and most of us do), you can use pipelining to speed up your page loads. This allows Firefox to load multiple things on a page at once, instead of one at a time (by default, it’s optimized for dialup connections). Here’s how:
* Type “about:config†into the address bar and hit return. Type “network.http†in the filter field, and change the following settings (double-click on them to change them):
* Set “network.http.pipelining†to “trueâ€
* Set “network.http.proxy.pipelining†to “trueâ€
* Set “network.http.pipelining.maxrequests†to a number like 30. This will allow it to make 30 requests at once.
* Also, right-click anywhere and select New-> Integer. Name it “nglayout.initialpaint.delay†and set its value to “0?. This value is the amount of time the browser waits before it acts on information it receives.
4. Keyboard shortcuts.
* Spacebar (page down)
* Shift-Spacebar (page up)
* Ctrl+F (find)
* Alt-N (find next)
* Ctrl+D (bookmark page)
* Ctrl+T (new tab)
* Ctrl+K (go to search box)
* Ctrl+L (go to address bar)
* Ctrl+= (increase text size)
* Ctrl+- (decrease text size)
* Ctrl-W (close tab)
* F5 (reload)
* Alt-Home (go to home page)
5. About:config. The true power user’s tool, about.config isn’t something to mess with if you don’t know what a setting does. You can get to the main configuration screen by putting about:config in the browser’s address bar. Clck here for more Mozillazine’s about:config tips and screenshots.
6. Remove the close tab button. Sometime you accidentally click on the close button of Firefox’s tabs? But with this trick you can move them or remove them, again through about:config. Edit the preference for “browser.tabs.closeButtonsâ€.
* 0: Display a close button on the active tab only
* 1:(Default) Display close buttons on all tabs
* 2:Don’t display any close buttons
* 3:Display a single close button at the end of the tab bar (Firefox 1.x behavior)
Showing posts with label Tutorials. Show all posts
Showing posts with label Tutorials. Show all posts
Wednesday, August 27, 2008
Tuesday, July 15, 2008
Using 128x128 32-bit Icons in Windows XP
Warning: This article involves editing your registry. Following these instructions is at your own risk. InterfaceLIFT and Seen Sai Yang are not responsible for any damage you may cause to your system.
Before you begin, you may want to read Using Mac OS X icons under Windows XP.
Windows XP has two settings for icons: normal and large. Normal icons are 32x32 and large icons are 48x48. Use these directions to get 128x128 32-bit icons.
Step 1.
In case you want to revert to your original settings after these icon changes, you may want to use the registry editor and write down the original settings. If you want to save the original settings, read on. If not, got to step 2.
- Open the registry editor by going to Start, select Run, type in regedit, and press Enter. With registry editor opened, browse to:
HKEY_CURRENT_USER\Control Panel\Desktop\WindowMetrics
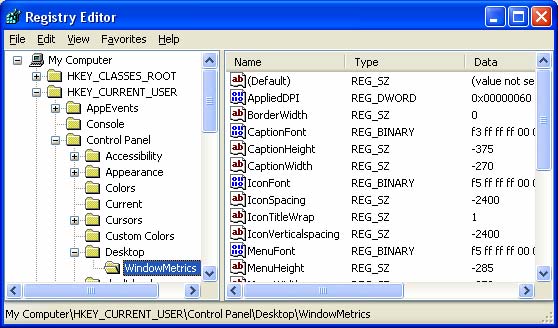
- Now on the right, scroll to find IconSpacing, IconVerticalspacing, Shell Icon BPP, and Shell Icon Size and write down their settings.
Step 2.
Download and extract 128x128 32-bit Icon.zip to get 128x128 32-bit Icon.reg.
Step 3.
3. Double click on 128x128 32-bit Icon.reg. When the folling message box appears, click Yes to make changes to the registry.
![]()
Under [HKEY_CURRENT_USER\Control Panel\Desktop\WindowMetrics], the following changes will be made to the registry:
- IconSpacing = -2400
- IconVerticalspacing = -2400
- Shell Icon BPP = 32
- Shell Icon Size = 128
Step 4.
Restart Windows XP and you are finished!
NOTE:
![]() When 128x128 icons are used in Windows XP, the shortcut overlay, which isn't anti-aliased, looks huge and ugly on the icons. To remove them, browse to Microsoft's PowerToys website, and download TweakUI.exe. Install and use TweakUI to remove the shortcut overlay.
When 128x128 icons are used in Windows XP, the shortcut overlay, which isn't anti-aliased, looks huge and ugly on the icons. To remove them, browse to Microsoft's PowerToys website, and download TweakUI.exe. Install and use TweakUI to remove the shortcut overlay.
![]()
Notice also that when you are using 128x128 icons, the icons in the Windows Start menu also change to 128x128. This may cause some icons in the start menu to not show because of space limitations. To fix this, change the standard Windows XP start menu to the classic start menu. To do this, right click on the start menu and select properties. On the Start Menu tab, select Classic Start menu then press OK.
![]()
Another way to deal with this situation is to eliminate some icons on the Start menu. Do this by clicking on the Customize... button with Start menu selected on the Start Menu tab. On the Advanced tab in the Start menu items scroll box, select Don¼t display this item for infrequently used items. Press OK when done.
![]()
Converting Mac OS X icons to Windows XP
Software
The following is a list of software used in this tutorial. Please download and install these programs under Windows XP before proceeding.
- Stuffit Expander for Windows
- Axialis IconWorkshop
1. Download Icons
Download a set of Mac OS X icons from InterfaceLIFT.com. For this tutorial, we will download Fat-Roll by Matthew Bice.
Save the file in a temporary or download folder.
2. Setup Stuffit Expander
You will need to setup Stuffit Expander to properly extract Macintosh files with resource forks from stuffit archives. If Expander is not setup properly, icons files may have a length of zero bytes after being expanded.
- Launch Aladdin Expander
- Choose Options from the Edit menu.
- Click on the Cross Platform tab.
- Chose the following settings:
- Convert Text files to Windows Format: Never
- Save Macintosh Files in MacBinary Format: Always
- Add File Extension: Never
- Click OK
This setup process only needs to be done once. You can skip this step the next time you convert Mac OS X icons to the format that Windows XP uses.
3. Extract Icon using Stuffit Expander
Drag and drop the downloaded file 0379_fatroll.sit onto the Stuffit Expander application icon. Extract the icon into the same place where you downloaded the file. Stuffit Expander will create two items: a SIT file called Fat-Roll.sit and a folder called Fat-Roll.
4. Rename Icon
Open the Fat-Roll folder. Inside is a subdirectory called The Icons. Open that folder and you will see 3 files. The file named 'Fat-Roll' is the actual icon file. Rename it to 'Fat-Roll.icns'. If the file already has the .icns extension you can simply leave it alone.
5. Open the Icon in IconWorkshop
If files with the .icns extension are properly recognized by Windows XP, you can simply double-click to open them in IconWorkshop. If not, launch the IconWorkshop program and select Open from the File menu. Locate and open the Fat-Roll.icns file.
6. Save the Icon as a Windows .ICO File
Once Fat-Roll.icns is open, save the file into the .ico format. To do this, select Save As from the File menu and set the Type to .ico. IconWorkshop will save the icon with the alpha channels preserved, allowing for transparency effects.
That is all there is to it! Once Mac OS X icons are converted to the .ico format, they can be used in Windows like any native icon.
If you're looking for the full 128x128 pixel dimensions, continue on with the second article in this series, Using 128x128 32-bit Icons in Windows XP.
Saturday, July 12, 2008


Thursday, July 10, 2008
HOWTO: Install and Boot OS X On a Flash Drive
Remember when it was first revealed the Windows XP could be installed and booted off of a USB flash drive? Well, great for Windows users. What about Mac users? We were left out in the cold. If one were to search hard enough in the vast Web index that is Google, one could find just the snippets of how to boot a system from a USB drive, how to set a drive as bootable, yadda yadda yadda. Nothing guiding the way to creating a bootable installation of Mac OS X on a flash drive. I’m here to help.
Before I begin, let me say that I have been a Mac user for only two years. I made the switch, and I’ve learned enough about OS X in that time to let me do this. So, without any more small-talk, let’s get into it!
Before You Begin
You will need a 1GB or larger flash drive. It is impossible to install OS X on anything smaller. After testing this procedure multiple times, the largest free space I had after booting up was 11.6MB.
You will also need the original Mac OS X Install Disc(s) that came with your computer.
Preparing the Flash Drive
Start out by completely formatting your flash drive. Open up Disk Utility, select your device from the source list (mine’s a SanDisk Cruzer), and click on the Erase tab. Be sure the filesystem is Mac OS Extended (Journaled), and uncheck the option to install Mac OS 9 drivers. Space is crucial, and there will be no point in having OS 9 recognize our device if we’re trying to get it to boot into OS X. Enter a name for your drive, and click on Erase.

If you click on the new drive name, you will see that Owners are not enabled.

We have to get that changed. Open up Terminal.app, and enter the following command:
sudo /usr/sbin/vsdbutil -a /Volumes/iTote
Be sure to change the name of the volume (iTote) to correspond to the name you gave your flash drive when you formatted it.

Owners should now be enabled.

Installing the Base System
In order to extract the critical system files and install them on the flash drive, we have to use Pacifist. Insert your Mac OS X Install Disc, and open Pacifist. When Pacifist recognizes the disc, click on Open Apple Install Packages.

Select your install media and click OK.

If you are prompted to insert another disc, click Skip. The files we are looking for are on the first disc.
After the package list loads, expand EssentialSystemSoftware, then EssentialSystemSoftwareGroup. The two packages that are needed in order for OS X to boot are BaseSystem and Essentials. Select them, then click on the File menu.

Select Install Files to Other Disk…

And choose your flash drive. Click Install to begin extracting and installing. This will take a while.

Remove Unnecessary Files
If you are using a drive smaller than 2GB, you will have to remove a few files before you can continue. Open up your flash drive, and navigate to /System/Library/Fonts. Scroll to the bottom, and you will find a group of Japanese and/or Chinese fonts. Removing these will free up over 100MB. DELETED! Be sure to empty your Trash.

Copy Missing Files
Because we extracted the system with Pacifist, there are a few files that are missing off our flash drive. Open up your main hard drive which has your running copy of OS X installed. Navigate to /System/Library/CoreServices. Copy SetupAssistant over to /System/Library/CoreServices on your flash drive. It might be easier to have two separate finder windows, as you will have to authenticate yourself when you copy the file.

Now we need to copy the package receipts for BaseSystem.pkg and Essentials.pkg onto our flash drive. Open your main hard drive again, and go to /Library/Receipts. Copy both BaseSystem.pkg and Essentials.pkg over to /Library/Receipts on your flash drive.

Make the Flash Drive Bootable
Now that all the required files are present, it’s time to make the system recognize the device as bootable. Open up Terminal.app once more, and enter the following command:
sudo bless –verbose –folder “/Volumes/iTote/System/Library/CoreServices” –bootinfo
This command “blesses” the CoreServices folder, which makes the system recognize it as an installed operating system. Again, be sure to substitute the name of your flash drive for the volume name in the above command.

Fixing File Permissions
When the files were copied from the installer CD, they didn’t have the correct permissions to allow the system to read and write to them. Open up Disk Utility, and select your flash drive. Click on Repair Disk Permissions, and go get yourself a coffee while it runs.

Booting From the Flash Drive
If you have an Intel Mac, you should be able to set the flash drive as the Startup Disk in System Preferences. For PowerPC Mac’s, things are a bit more complicated. I’m not going to re-invent the wheel, so I’ll forward you on to this article.
In Closing
Before you start complaining that this technique does not work with Intel Mac’s, be aware that I have not tested this on an Intel Mac because, well, I don’t have one. If anyone has an Intel Mac, please let me know if you can get this working, and what differences there are in the procedure.
Create Windows 98/ME/NT/2K/XP/2003 all in one installation DVD
Create Windows 98/ME/NT/2K/XP/2003 all in one installation DVD
You are here: Tutorials > Create Windows 98/ME/NT/2K/XP/2003 all in one installation DVD
1. Prepare Windows installation CD
-
Windows 98 installation CD.
-
Windows ME installation CD.
-
Windows NT 4.0 Server installation CD.
-
Windows 2000 professional installation CD.
-
Windows XP installation CD.
-
Windows 2003 installation CD.
2. Collection of the bootable image file from Windows installation CD
-
Make "boot_os" folder on C: (you may change to other driver)
-
Insert Windows 98 installation CD into CD/DVD-ROM
-
Export bootable information from Window 98 installation CD to c:\boot_os\boot98.bif
1. Click "Make CD/DVD image file from CD/DVD-ROM " button to open "make iso from cd-rom" dialog

2. Choose CD-ROM, Input the output file name and choose "export boot image" option.

3. Click OK.
-
Insert Windows ME installation CD into CD/DVD-ROM
-
Export bootable information from Window ME installation CD to c:\boot_os\bootme.bif
-
Insert Windows NT 4.0 installation CD into CD/DVD-ROM
-
Export bootable information from Window NT4.0 installation CD to c:\boot_os\bootnt.bif
-
Insert Windows 2000 professional installation CD into CD/DVD-ROM
-
Export bootable information from 2000 professional installation CD to c:\boot_os\boot2k.bif
-
Insert Windows XP installation CD into CD/DVD-ROM
-
Export bootable information from Window XP installation CD to c:\boot_os\bootxp.bif
-
Insert Windows 2003 installation CD into CD/DVD-ROM
-
Export bootable information from Window 2003 installation CD to c:\boot_os\boot2k3.bif
3. Making of multiple OS installation DVD image file
-
Click "Create new image file" button on toolbar.

-
Click
 button to create "Win98" folder into root directory.
 -
Insert Windows 98 installation CD to CD-ROM.
-
Add all files and folders from Windows 98 installation CD to "Win98" folder.
-
Click
 button to save Windows 98 installation into c:\multi_os.iso ( you may choose other iso image file name)

-
Take out Windows 98 installation CD, and insert Windows ME installation CD to CD/DVD-ROM
-
Click
button to create "WinME" folder into root directory. -
Add all files and folders from Windows ME installation CD to "WinME" folder.
-
Click
button to save Windows ME installation into multi_os.iso

-
Take out Windows ME installation CD, and insert Windows NT 4.0 installation CD to CD/DVD-ROM
-
Click
button to create "WinNT" folder into root directory. -
Add all files and folders from Windows NT 4.0 installation CD to "WinNT" folder.
-
Click
button to save Windows NT 4.0 installation into multi_os.iso

-
Take out Windows NT 4.0 installation CD, and insert Windows 2000 Professional installation CD to CD/DVD-ROM
-
Click
button to create "Win2K" folder into root directory. -
Add all files and folders from Windows 2000 Professional installation CD to "Win2K" folder.
-
Click
button to save Windows 2000 Professional installation into multi_os.iso

-
Take out Windows 2000 Professional installation CD, and insert Windows XP installation CD to CD/DVD-ROM
-
Click
button to create "WinXP" folder into root directory. -
Add all files and folders from Windows XP installation CD to "WinXP" folder.
-
Click
button to save Windows XP installation into multi_os.iso

-
Take out Windows XP installation CD, and insert Windows 2003 installation CD to CD/DVD-ROM
-
Click
button to create "Win2K3" folder into root directory. -
Add all files and folders from Windows 2003 installation CD to "WinXP" folder.
-
Click
button to save Windows 2003 installation into multi_os.iso

4. Do some change of multiple OS installation DVD image file for creating multiple bootable DVD
-
Open c:\multi_os.iso with MagicISO.
-
Copy the folder "\Win2K\i386" to "\iW2K".
1. Hold the CTRL key down, and use mouse to drag folder "\Win2K\i386" to root.

2. Click button to rename i386 to iW2K.

-
Copy the folder "\WinXP\i386" to "\iWXP".
1. Hold the CTRL key down, and use mouse to drag folder "\WinXP\i386" to root.

2. Click button to rename i386 to iWXP.

-
Copy the folder "\Win2K3\i386" to "\i2K3".
1. Hold the CTRL key down, and use mouse to drag folder "\Win2K3\i386" to root.

2. Click button to rename i386 to i2K3.

-
Copy the file "\Win2K\CDROM_IP.5" and "\Win2K\CDROM_NT.5" to root directory.
Hold the CTRL key down, and use mouse to drag the files "\Win2K\CDROM_IP.5" and "\Win2K\CDROM_NT.5" to root.

-
Copy the file "\WinXP\WIN51" and "\WinXP\WIN51IP" to root directory.
Hold the CTRL key down, and use mouse to drag the files "\WinXP\WIN51" and "\WinXP\WIN51IP" to root.

-
Copy the file "\Win2K3\WIN51IA" to root directory.
Hold the CTRL key down, and use mouse to drag the files "\Win2K3\WIN51IA" to root.

-
Create "iW2K" folder into "c:\boot_os"
-
Extract "\iW2K\SETUPLDR.BIN" file to "c:\boot_os\iW2K".
1. Select "\iW2K\SETUPLDR.BIN" file.
2. Click button to extract the file to "c:\boot_os\iW2K".
-
Open "c:\boot_os\iW2K\SETUPLDR.BIN" with UltraEdit or WinHex.
-
Replace all words "I386" with "IW2K"(Must be capitalization).
1.Click "seach"->"Replace" menu item. Or Press "CTRL+R"

2. Input "I386" into "Find What". Input "IW2K"(Must be capitalization) into "Replace With"

3. Click "Replace All" button.
4. Press CTRL+S to save the modified file.
-
Copy c:\boot_os\iW2K\SETUPLDR.BIN back to "\iW2K\SETUPLDR.BIN" within c:\multi_os.iso.
-
Extract "\iW2K\TXTSETUP.SIF" file to "c:\boot_os\iW2K".
1. Select "\iW2K\TXTSETUP.SIF" file.
2. Click button to extract the file to "c:\boot_os\iW2K".
-
Open "c:\boot_os\iW2K\TXTSETUP.SIF" with UltraEdit or NotePad
-
Replace all words "\i386" within the section "[SourceDisksNames.x86]" with "\IW2K"

-
Copy "c:\boot_os\iW2K\TXTSETUP.SIF" back to "\iW2K\TXTSETUP.SIF" within c:\multi_os.iso.
-
Create "iWXP" folder into "c:\boot_os"
-
Extract "\iWXP\SETUPLDR.BIN" file to "c:\boot_os\iWXP".
1. Select \iWXP\SETUPLDR.BIN file.
2. Click button to extract the file to "c:\boot_os\iWXP".
-
Open "c:\boot_os\iWXP\SETUPLDR.BIN" with UltraEdit or WinHex
-
Replace all words "I386" with "IWXP"(Must be capitalization).
-
Copy c:\boot_os\iWXP\SETUPLDR.BIN back to "\iWXP\SETUPLDR.BIN" within c:\multi_os.iso
-
Extract "\iWXP\TXTSETUP.SIF" file to "c:\boot_os\iWXP".
1. Select "\iWXP\TXTSETUP.SIF" file.
2. Click button to extract the file to "c:\boot_os\iWXP".
-
Open "c:\boot_os\iWXP\TXTSETUP.SIF" with UltraEdit or NotePad
-
Replace all words "\i386" within the section "[SourceDisksNames.x86]" with "\IWXP"
-
Copy "c:\boot_os\iWXP\TXTSETUP.SIF" back to "\iWXP\TXTSETUP.SIF" within c:\multi_os.iso.
-
Create "i2K3" folder into "c:\boot_os"
-
Extract "\i2K3\SETUPLDR.BIN" file to "c:\boot_os\i2K3".
1. Select \i2K3\SETUPLDR.BIN file.
2. Click button to extract the file to "c:\boot_os\i2K3".
-
Open "c:\boot_os\i2K3\SETUPLDR.BIN" with UltraEdit or WinHex
-
Replace all words "I386" with "I2K3"(Must be capitalization).
-
Copy c:\boot_os\W2K3\SETUPLDR.BIN back to "\i2K3\SETUPLDR.BIN" within c:\multi_os.iso.
-
Extract "\i2K3\TXTSETUP.SIF" file to "c:\boot_os\i2K3".
1. Select "\i2K3\TXTSETUP.SIF" file.
2. Click button to extract the file to "c:\boot_os\i2K3".
-
Open "c:\boot_os\i2K3\TXTSETUP.SIF" with UltraEdit or NotePad
-
Replace all words "\i386" within the section "[SourceDisksNames.x86]" with "\I2K3"
-
Copy "c:\boot_os\i2K3\TXTSETUP.SIF" back to "\iWXP\TXTSETUP.SIF" within c:\multi_os.iso.
-
Click
button to save c:\multi_os.iso.
-
Open "c:\boot_os\boot2k.bif" with UltraEdit or WinHex.
-
Replace all words "I386" with "IW2K"(Must be capitalization).
-
Open "c:\boot_os\bootxp.bif" with UltraEdit or WinHex.
-
Replace all words "I386" with "IWXP"(Must be capitalization).
-
Open "c:\boot_os\boot2k3.bif" with UltraEdit or WinHex.
-
Replace all words "I386" with "I2K3"(Must be capitalization).
5. Making of multi-boot image file
-
Click "Make multi-boot CD/DVD image file" button to open "Multi-Boot Image Editor"

-
Click "Add ..." button to add one boot item into multi-boot image file.

-
Choose "Boot from bootable image file" option. and click "Next" button to next step.

-
Choose "From Local Computer" option, and input "c:\boot_os\boot98.bif", and click "Next" button to next step.

-
Input description of Window 98 boot image, and set "Hot Key" to "1"

-
Click "Finish" to complete Windows 98 bootable item.

-
Add Windows ME bootable item in the same way as creating Windows 98 bootable item.
From Local Computer: c:\boot_os\bootme.bif Description: 2. Install Window ME Hok Key: 2
-
Add Windows NT 4.0 bootable item in the same way as creating Windows 98 bootable item.
From Local Computer: c:\boot_os\bootnt.bif Description: 3. Install Window NT 4.0 Hok Key: 3
-
Add Windows 2000 professional bootable item in the same way as creating Windows 98 bootable item.
From Local Computer: c:\boot_os\boot2k.bif Description: 4. Install Window 2000 Professional Hok Key: 4
-
Add Windows XP bootable item in the same way as creating Windows 98 bootable item.
From Local Computer: c:\boot_os\bootxp.bif Description: 5. Install Window XP Hok Key: 5
-
Add Windows 2003 bootable item in the same way as creating Windows 98 bootable item.
From Local Computer: c:\boot_os\boot2k3.bif Description: 6. Install Window 2003 Hok Key: 6
-
Add first assistant bootable item for booting from hard disk.

-
Choose booting from first hard disk

-
Input "7. Boot from hard disk" into description of bootable item, and set "Hot Key" to "7", and click "finish" button

-
Add second assistant bootable item for booting from floppy driver.

-
Input "8. Boot from floppy driver" into description of bootable item, and set "Hot Key" to "8", and click "finish" button

-
Add third assistant bootable item for reboot

-
Input "9. Reboot" into description of bootable item, and set "Hot Key" to "9", and click "finish" button

-
Set "boot from hard disk" as default bootable item. (you may choose other bootable item)

-
Click "Save" button to save multi-boot image file to c:\boot_os\multi_os_boot.mbi
-
Click "Close" to complete making of multi-boot image file.
5. Making of multi-boot image file
-
Click "Make multi-boot CD/DVD image file" button to open "Multi-Boot Image Editor"
-
Click "Add ..." button to add one boot item into multi-boot image file.
-
Choose "Boot from bootable image file" option. and click "Next" button to next step.
-
Choose "From Local Computer" option, and input "c:\boot_os\boot98.bif", and click "Next" button to next step.
-
Input description of Window 98 boot image, and set "Hot Key" to "1"
-
Click "Finish" to complete Windows 98 bootable item.
-
Add Windows ME bootable item in the same way as creating Windows 98 bootable item.
From Local Computer: c:\boot_os\bootme.bif Description: 2. Install Window ME Hok Key: 2
-
Add Windows NT 4.0 bootable item in the same way as creating Windows 98 bootable item.
From Local Computer: c:\boot_os\bootnt.bif Description: 3. Install Window NT 4.0 Hok Key: 3
-
Add Windows 2000 professional bootable item in the same way as creating Windows 98 bootable item.
From Local Computer: c:\boot_os\boot2k.bif Description: 4. Install Window 2000 Professional Hok Key: 4
-
Add Windows XP bootable item in the same way as creating Windows 98 bootable item.
From Local Computer: c:\boot_os\bootxp.bif Description: 5. Install Window XP Hok Key: 5
-
Add Windows 2003 bootable item in the same way as creating Windows 98 bootable item.
From Local Computer: c:\boot_os\boot2k3.bif Description: 6. Install Window 2003 Hok Key: 6
-
Add first assistant bootable item for booting from hard disk.
-
Choose booting from first hard disk
-
Input "7. Boot from hard disk" into description of bootable item, and set "Hot Key" to "7", and click "finish" button
-
Add second assistant bootable item for booting from floppy driver.
-
Input "8. Boot from floppy driver" into description of bootable item, and set "Hot Key" to "8", and click "finish" button
-
Add third assistant bootable item for reboot
-
Input "9. Reboot" into description of bootable item, and set "Hot Key" to "9", and click "finish" button
-
Set "boot from hard disk" as default bootable item. (you may choose other bootable item)
-
Click "Save" button to save multi-boot image file to c:\boot_os\multi_os_boot.mbi
-
Click "Close" to complete making of multi-boot image file.